Wednesday, December 30, 2009

my sister-in-law stephanie

if you have ever had stephanie come to stay with you, you know that she finds any camera(including cell phone cameras) and leaves little surprise pictures on them. here is one that i just found!
maybe posting this will stop her from this madness!

that's what you get steph!

p.s. we miss you please come visit!

Tuesday, December 29, 2009

it didn't snow on christmas...but it snowed today!

with my birthday boots on, a hand warmer in the back pocket of my jeans, and a bunch of bundled up kids we headed out the door


trey and his friend eli eating snowball Popsicles


trey and i


we got out the shovel and made a snowboarding ramp!


i ran to pick trey up after his first crash to find him mouth open and tongue stuck out eating the falling snow.


here is eli at his first try snowboarding.
do any of you know eli?
don't tell his mom :o)

Friday, December 25, 2009

it was a christmas morning we will never forget

Santa thought it would be a good idea to bring Trey & Lucy bunnies for Christmas:o)

meet "chocolate ice cream"...

(he looks cute doesn't he...this picture was taken right be for he peed in the basket. mom was not happy)


but look how happy Santa made trey.


trey's happiness almost makes up for Chocolate Ice Cream peeing in the cute little basket.


here's lucy's bunny "snowball."

Santa did you really need to bring us two bunnies?


it got even worse when i realized that i am totally allergic to bunnies.
i have been sneezing ever since!
i can feel my throat closing in on me and my neck is starting to itch just thinking about it!

yes yes this is definitely a Christmas we will never forget.


(i have no pictures of me with the kids. i asked my husband to take just one picture and this is what we end up with. thanks honey :o)


Merry Christmas Everyone!

p.s. Here are the winners of the headbands

Comment #60 Jen @ Lipstick & Laundry
Comment #96 Rachel & The Haney Life

email me and i'll get you those headbands!
treyandlucyblog@gmail.com

Thank you so much for all of your wonderful comments!
you can still get the tutorial for the headbands in my etsy shop!

Tuesday, December 22, 2009

A tutorial for my Etsy shop & a giveaway

Giveaway closed
you can purchase the tutorial for these headbands in my etsy shop.

My little fingers just barely got finished typing up this tutorial for my etsy shop!
I made up two different headband tutorials that are available in the shop.
I love the vintage feel to these!
They are some of my most favorite tutorials yet!
They are also VERY simple to make! You could make a ton in one night!


Here is the second, a Single Rosette Headband.

The tutorials are PDF files that will be emailed right to you!
They come with awesome step-by-step insctuctions and photo's to guide you the whole way through!
These would make amazing last minute Christmas gifts!
Or something you could sit around and do with your sisters and mothers during the Christmas break!
Also because it is almost Christmas I want to give away an actual headband.
2 actually!
They are the two pictured below.
So leave a comment and I will pick two lucky winners on Christmas Day!


Don't forget to go to my etsy shop and get your tutorial.

It will be emailed the same day it is purchased and the payment is cleared.

MERRY CHRISTMAS EVERYBODY!

Thursday, December 17, 2009

my prayers have been answered

Friday
Dec 25

Snow Shower
Snow Showers

High 39°
Low 34°

Tuesday, December 15, 2009

giveaway


Hey everyone! A friend of a friend contacted me and asked if I would put her button on my blog.
She is my very first sponsor I guess :o)

She has a brand spankin' new blog and is doing a giveaway!

Your chances of winning are awesome! Seriously she just posted it and you will be some of the first!

So go check it out!

Here is the link

Also here is some of her work! I think she really does a great job and her prices are fantastic!


Monday, December 14, 2009

bean bags

a couple of months ago i made a bean bag for trey.
he loved it!
but there was one problem...his little sister couldn't keep her grubby little fingers away from it :o)
so i decided to make one for her and i just finished it!


these are awesome and would make a great gift for kids.
the kiddo's are jumping on them all day long.


the cover is removable so it can be washed.


isn't she the cutest!?
i'll have to admit that i wasn't thinking that today when we were driving in the car.
she was upset with me for picking her up from her friends house and she said,
"mom i am going to hit you when we get home."
where did i go wrong?
it's a good thing you are so darn cute lucy lu.

Sunday, December 13, 2009

this is what my night looks like


every year i spend my nights in december staying up late and making gifts for family & friends.

i am in my pj's still wearing my headband i wore to church today.

the night is young. it's me, the light from the christmas tree, the warmth from the fire, my sewing project, and "mr. krueger's christmas."
i cried twice. love that jimmy Sterwart.

get your free copy of "mr. krueger's christmas" here.

Saturday, December 12, 2009

holiday treat

last year someone brought us a christmas goody tin with these little babies in it, and i have never forgotten their sweet tasting goodness. here is how to make them.

what you'll need:

a big bag of small pretzels
2 bags of rolo candies
whole pecans

spread your pretzels out on a big cookie sheet.
then place one rolo on top of each pretzel.

they are already looking good aren't they?
it gets better.


put your baking sheet in the oven at 250 degrees for about 4 minutes.
just until you start to notice those rolos are starting to get nice and soft.

then remove the sheet from the oven.
push one pecan onto each rolo.


wait for the chocolate to become hard again.
we set ours onside in the wintery temperatures and they set up in about 15 minutes.


then enjoy.
you will not regret giving these a try!
in fact you can just go ahead and thank me in advance if you would like :o)


there has been a lot of treat making around here.
my friend erin and i spent hours in the kitchen yesterday.


we came up with a really great & inexpensive way to dress up your treats.
we got these goodie bags at that dollar store as well as the ribbon.
that's just $2 folks:o)


then we made these homemade gift tags in photoshop elements.


hurry go make some!
your neighbors, friends, co-workers, people you don't like but know are going to give you a goodie bag are waiting!


Friday, December 11, 2009

brrrrrrrrr...

it is ccccccold outside!
seriously it is 12 degrees!
the kids and i were talking yesterday. we were missing summer.
the smell of sunblock, riding our bikes, playing at the park, and especially our neighborhood pool.
the kids were sad...real sad.


so i said "that's it...go get your swimsuits on! we are having a pool party!"


complete with a lot of splashing...
(all over the walls, even the ceiling)


floaties, kick boards...


and a whole lot of fun!


Monday, December 07, 2009

hanging dishtowel

Here is the post I did for the blog swap over at Somewhat Simple.


We have a huge problem over at our house.
Our dishtowels are always ending up on the floor and it is enough to drive a girl crazy!
I have solved our problem by making these awesome hanging dishtowels.
They would make great family, friend, neighbor, or co-worker gifts!


Here is what you will need:
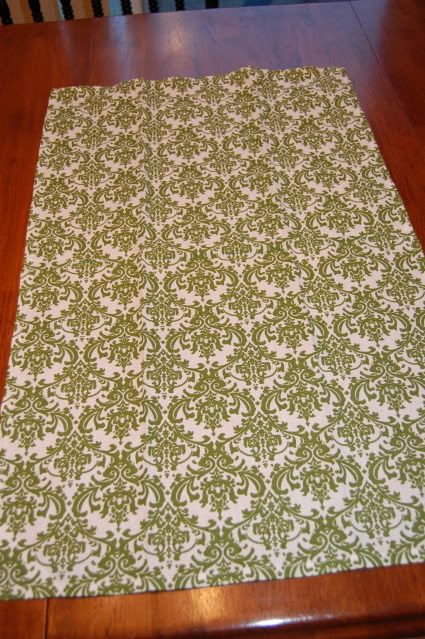
1 dishtowel
1 potholder
1 button


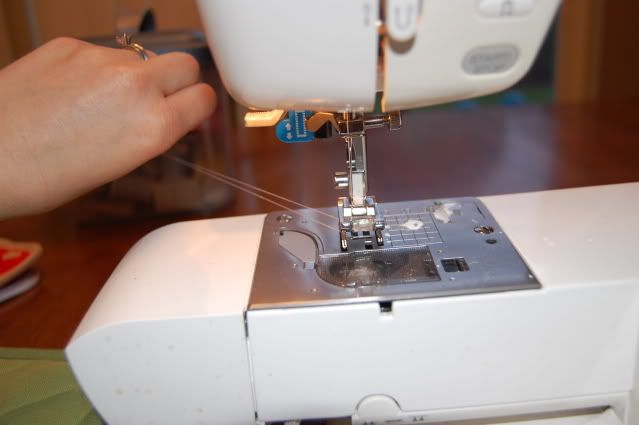
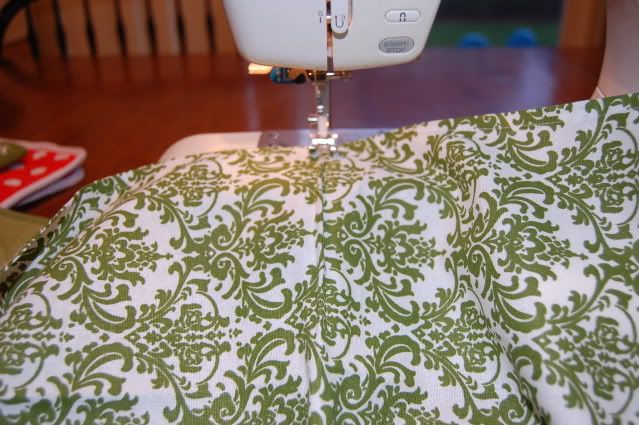
The first thing you are going to do is baste across your dishtowel.
Pull on both threads out of your machine making a long tail of thread.


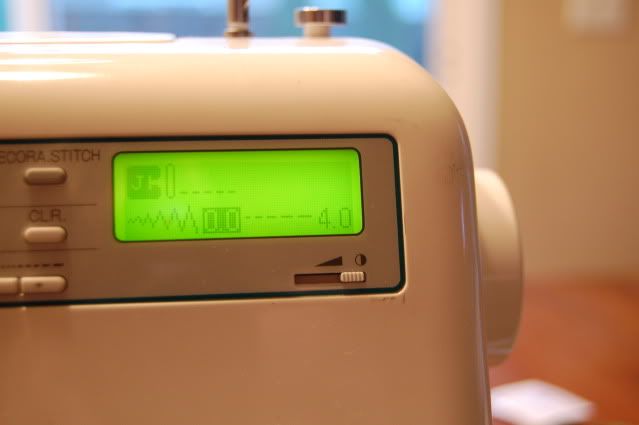
Then set your machine to a "0" stitch width and a "4'' stitch length.


Sew across you dishtowel right down the middle.
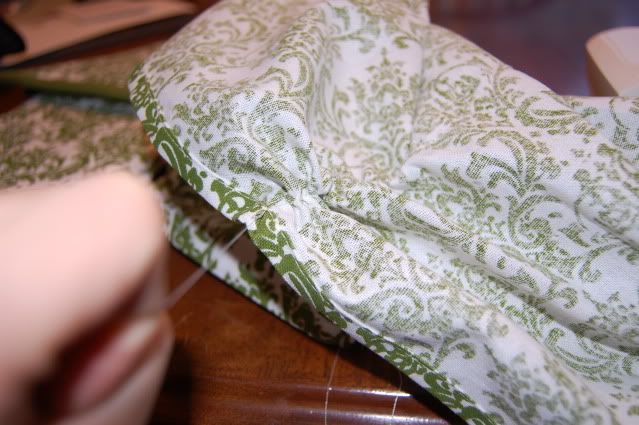
When you are done sewing do not cut your thread!
Lift your presser foot and pull your dishtowel out making another long tail of thread and then cut.


Grab a hold of one thread while gathering your dishtowel until it is all gathered and the same width as your potholder.


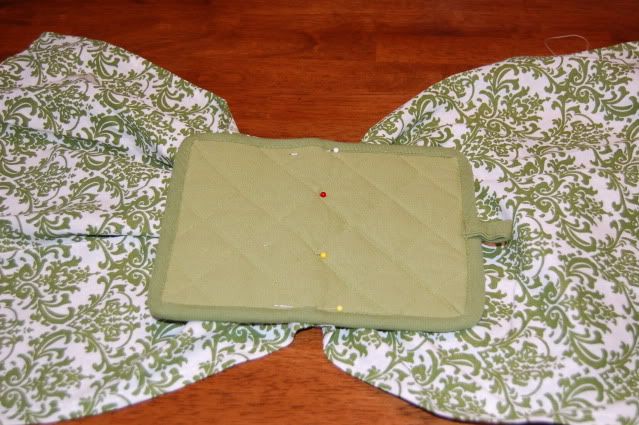
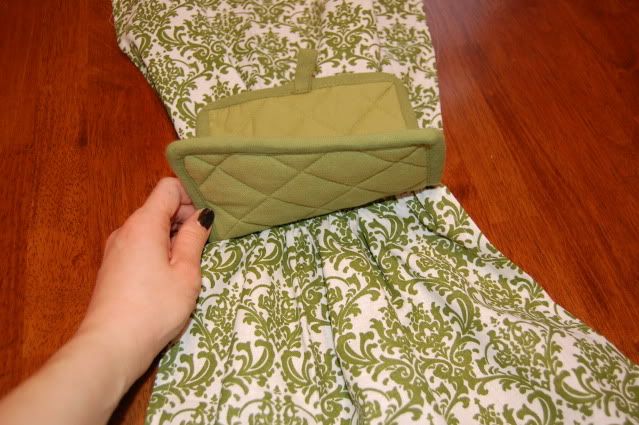
Pin your potholder to your dishtowel.


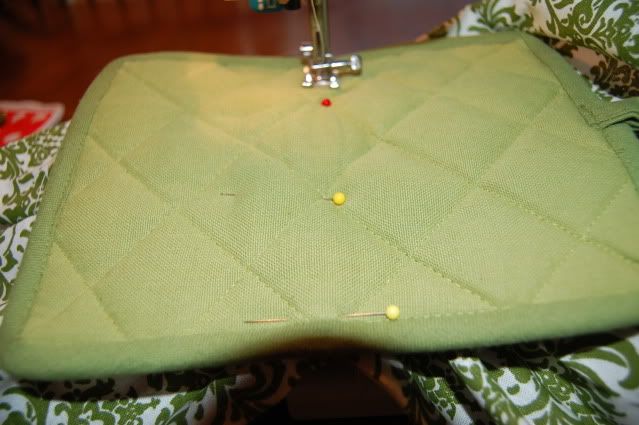
Then sew across your potholder right down the middle.
Make sure to switch your stitch length back to "2.5" so you aren't basting anymore.

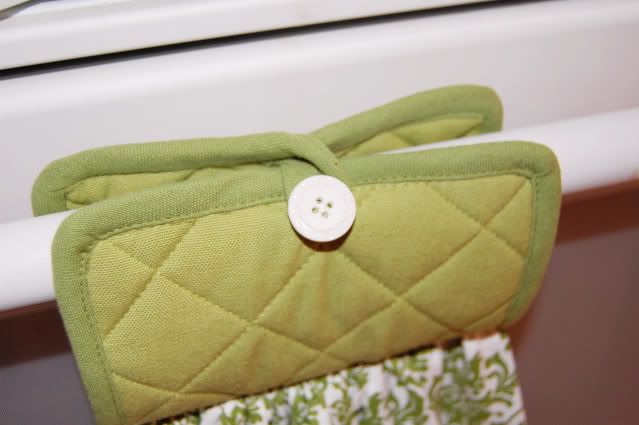
Take the bottom of your potholder and bring it up to meet the top.


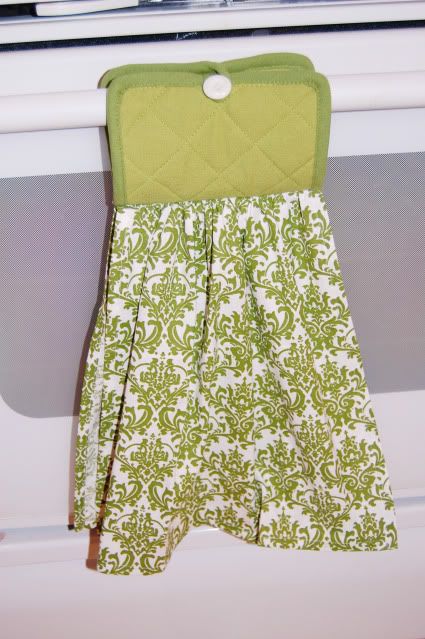
The last step is to sew a button to the front of your potholder.


You are done!
How cute would it be to make a few of these in coordinating color, tie a cute ribbon around them, and give them as a gift in a set!?


Have a Merry Christmas everybody!